
a tiny, but entirely capable device
Garmin Rynning Dynamics Pod

Pros
- Very small
- Run Power statistics
- Can identify bad running form
- Easy to use
- Coin cell battery – no charging
Cons
- Requires smartwatch to work
- Few insights on what to do with running form data
In this hands-on review I test out the Garmin Running Dynamics Pod. This is a tiny device that collects and stores data to help you assess your running form.
Essential reading: Best fitness trackers and health gadgets
The pod-like gadget has been around for a few years now. The bunch of metrics that it spits out always piqued my interest, but not enough to go for the purchase. It is only when I recently upgraded to the Forerunner 955 that I decided to go for the $70 device.
This is because it allows the Forerunner to gather Run Power data. To remind, Garmin has added native integration for this with its latest watch release. But Run Power needs either the Running Dynamics Pod or one of the company’s chest straps in order to work.
Here’s everything you need to know about the Garmin Running Dynamics Pod.
Jump to
Design & hardware
Features
The verdict
Garmin Running Dynamics Pod review: Design & hardware
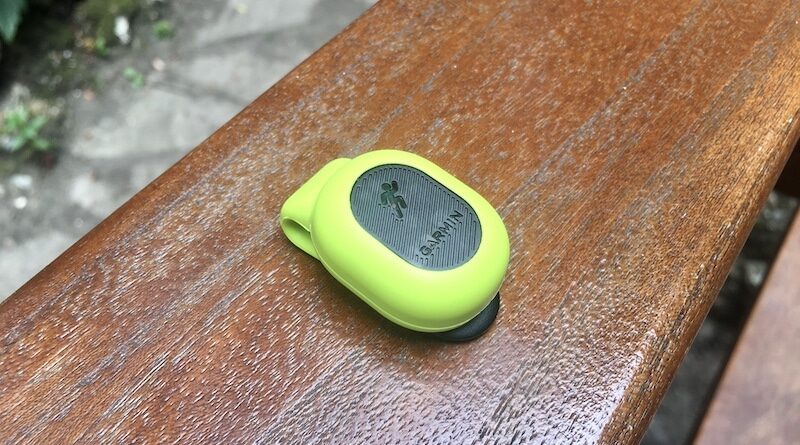
I was surprised when I took the Running Dynamics Pod out of the box. It is tiny, very tiny. About the size of a UK 50 cent coin as shown in the image below.

There is not much else in the box apart from a little instruction booklet. That’s because you don’t need anything else apart from a Garmin watch. The wearable does not re-charge so there’s no need for cables. Instead, it works on a single coin cell battery. When the battery runs out you can replace it with a new one. A replacement will cost you between $2 or $3. So not a huge expense.
Opting for replaceable batteries was a sensible decision by Garmin. Why worry about yet another cable? Assuming daily use of one hour, you can expect the battery to run for about a year. In fact, most people will not use it that much so I’m guessing they could probably get two years of use out of it before needing to replace the battery.
The module which houses the accelerometer is housed in a soft silicone clip. Stretch it a bit and you can easily remove the Pod.
As far as placement, you are meant to attach the device on your back – to the center of your waistband. The silicone bit extends to a flexible clip which you can secure to your running pants.
My worry initially was that the pod might fall. The first few runs I found myself touching the pod every once in a while to alleviate my fears. But that was unfounded. The clip is very strong and when in place it stays firmly in place. No danger whatsoever of it falling off.

Having said that, the pod’s tiny size is a mere 37.6 mm x 23.2 mm x 19.2 mm and weight 12 grams. So I could see myself eventually losing it, either by leaving it in my pocket or misplacing it somewhere. But that’s not Garmin’s fault.
So far I have been extra careful to leave it in a safe place after each run. Perhaps that is why the company chose the flashy yellow silicone surround – it makes it stand out more.
Another interesting thing about the Running Dynamics Pod is that it has no on/off button. When you attach it to your waistband it will automatically switch on because it will sense movement. Leave it somewhere post-run and it can figure out your are not using it any more and will automatically switch off. Another point towards simplicity – another plus.
As far as water-resistance, the rating of the gadget is only 1 ATM. Which means occasional splashes, rain or snow and even showering is fine. But you can’t submerge it in water or swim with it. It would be kind of pointless anyway doing that sort of thing.
Technical specifications recap
|
Pod in clip dimensions |
37.6 mm x 23.2 mm x 19.2 mm (LxWxD) |
|
Weight |
12 grams |
|
Display |
None |
|
Sensors |
Accelerometer |
|
Battery life |
1 year (assuming 1 hour per day of use) |
|
Battery type |
CR1632 (user-replaceable) |
|
Water rating |
1 ATM |
|
Ant+ connectivity |
Yes |
|
Data captured |
Cadence, Ground Contact Time, Stride Length, Vertical Oscillation, Vertical Ratio, Ground Contact Time, Run Power (with compatible watch) |
Garmin Running Dynamics Pod review: Functionality
To first use the device you will need to pair it with a compatible smartwatch. The Pod does not work with non-Garmin gear, so that is something to be aware of.
Pairing is done the same as with any other ANT+ accessory.
- Go to Settings on the compatible device, choose Sensors and Accessories.
- Then choose the Add New option and Search All. The watch will automatically scan the surrounding area so make sure to bring the Pod close and shake it to make sure it is on.
- After a little while you’ll get the message that the Pod is connected. In my case it appears in the list of accessories under RD Pod – xxxxxx (6 digit number). So you should get something similar.
That’s pretty much it as far as setup. This initial pairing only needs to be done once. From that point on, as long as the Pod is awake, it will automatically connect to your watch when it is in run mode.
One other thing you will want to do is add some new Data Screens to your run profile. This is so that you can view the running dynamics info and power run info on the watch itself in real-time.
Without going into to much detail, the procedure is as follows:
- Open up Settings on the watch and choose Activities & apps.
- Select Run.
- Select Run Settings.
- Choose Data Screens.
- Then it is simply a matter of adding the appropriate Running Form and/or Power Data fields and tweaking this to your liking.
In my case tis brought the total number of individual Data Screens to a total of five on my Forerunner 955 setup. I created a separate page for running dynamics metrics and one for run power. During exercise I would occasionally transition into one of these.

The data
Checking on running dynamics metrics on the watch allows you to tweak your form while you are in motion. However, of more use is the post-run data which allows you to review:
- Cadence,
- Ground Contact Time,
- Stride Length,
- Vertical Oscillation,
- Vertical Ratio,
- Ground Contact Time
- Power data (with a compatible watch)
All of this is available in both the Garmin Connect mobile app and the web dashboard. But the latter is perhaps more useful as it allows you to group the data into weekly, monthly, six monthly and longer-term charts.
The same is the case with the power data which I will not go into much detail in this review. You can read my full overview of this functionality in a separate, more detailed, piece I did a few days ago.
To summarize, the functionality works in exactly the same way as the Garmin Connect IQ run power store solution. But this is now natively built in as long as your watch is compatible. At the time of writing, this includes the Forerunner 955 and 255. The feature is in Beta for Fenix 7 and Epix 2 and we are also expecting the Forerunner 945 LTE and perhaps a few other Garmin watches to get it in the months ahead. But if you don’t have one of these watches, you can still use the Pod to estimate running power but via the Connect IQ store solution.
Of course, the other option is to use a Garmin heart rate chest strap, such as HRM-Run or HRM-Tri. You will get the same type of data, with the addition of heart rate. But this is less convenient as it means putting a strap around your chest each time you head out for a run.
Shown below is a summary of the type of data you get in Garmin Connect after a run.

Some of this can be displayed in colour-coded charts and overlayed with lots of other data such as elevation, pace, heart rate and much more. The different colours correspond to how close you are to the ideal range.


The data can also be segregated into laps and segments. So for each lap or segment you can get detailed running dynamics metrics and run power.

The long-term charts displaying how the data is changing over time are shown below. These can be utilised to follow trends.


How useful are all these statistics?
The obvious question is to do with the usefulness of these types of biomechanical measurements. In my view, it is only now that the native Run Power functionality has been added that it makes sense to purchase the Running Dynamics Pod. At least for me, it is what made the difference between purchasing and not purchasing the device.
That’s because the running dynamics metrics on their own have limited use. Particularly as Garmin does not provide any actual insights into the data. So you are left on your own to draw conclusions and turn the statistics into meaningful data.
One useful thing you can do is click on “Help” when viewing any particular running dynamics metric. This offers a brief explanation and shows “ideal” ranges to aim for.
For example with cadence (or the number of steps per minute), you want to aim for a high spm (steps per minute) figure. A typically cited target is over 180spm. This figure is also used in combination with GPS data from your watch to calculate the length of your stride during a run.

Vertical oscillation, on the other hand, measures the vertical torso movement with each step while running. It is captured in centimeters. In this case, you typically want to aim for a lower number as lower vertical oscillation is more economical and provides less stress on the body. Here are the target ranges.

Ground Contact Time is also important. You want to be scraping the pavement just barely to propel forward whereas bouncing off the ground and having your head go higher is inefficient. This metric is also directly correlated with injury since the more time you spend on the ground the higher the impact on your body. Aim for a low amount of time.
Then we have, Ground Contact Time Balance which measures your run symmetry by keeping track of the balance between your left and right foot ground contact time. The metric is shown as a percentage greater than 50% with an arrow to the left or right to show which foot is on the ground longer. Needless to say, you want to aim for perfect symmetry – so as close to 50/50 as possible. Deviating from this a lot can lead to poor running form or can be an indicator of an injury.

I found the data interesting to sift through after the first few runs. Although it was difficult to draw conclusions as the info would differ from run to run depending on how fast I was going. But in general, I found that my run balance and ground contact time were pretty decent. And that I need to work towards lowering my vertical oscillation in order to improve my run economy.
My run cadence is also good. The benefit of using the running pod instead of the watch on your wrist for this type of data is that the pod will be more accurate.
I see myself using the graphs from time to time to check for consistency and changes. For example, if my balance is off I can do some extra stretching to loosen the muscles.
But it would be more useful if Garmin could do the analysis for you and spit out some useful suggestions and insights. Anything other than a nice, relaxed posture, good forward lean, decent cadence – has room for improvement.
Used right, this type of data also has potential to show potential soreness or early onset of injury. For example, if you suddenly start favouring one leg over the other. So look for trends and changes for the better or worse. For those recovering from an injury it can offer a way to gradually ease into things.
Data nerds will feel right at home! And let’s face it – a lot of this data is just cool to look at!

Garmin Running Dynamics Pod review: The verdict
Garmin’s tiny, but entirely capable, Running Dynamics Pod is an interesting little device. Clip it to the back of your waistband and it will track a range of running dynamics metrics, including power data if you have a compatible watch.
The data is interesting to read through, although it does suffer from a lack of insights. So you are left on your own to draw conclusions and see how close you are to recommended ranges. Study your run cadence, vertical ratio, ground contact time balance and more, to find out how you deviate from ideal running form. This type of info can also be useful as an indicator of an early onset of injury.

|
Garmin Running Dynamics Pod |
 |
The device does what it says on the tin and its ANT+ connectivity is good. I really like the simplicity of use and the fact that there is no charging. Once the battery runs out in a year or two, spend $2-3 to purchase a replacement battery.
However, what actually nudged me into the $70 expense is the fact that I recently bought the Forerunner 955. Native run power data is now easy to use, as long as you have the Running Dynamics Pod. Sure you can opt for a Garmin heart rate chest strap for the same type of data, but for me it is much easier and less cumbersome to clip something on to my running shorts. I do not regret the purchase.
Overall, I think most users will prefer the Pod rather than the strap. The Pod is simple, unobtrusive and comfortable. Most importantly, the extra data it provides has the potential to help you improve running mechanics, efficiency and avoid injury.
You can check the Running Dynamics Pod on Garmin’s website. It can also be picked up on Amazon and other retail outlets.
*We are a review site that receives a small commission from sales of certain items, but the price is the same for you. Purchasing items by clicking on links in this article allows us to run this website. We are independently owned and all opinions expressed here are our own. See our affiliate disclosure page for more details.
Like this article? Subscribe to our monthly newsletter and never miss out!